


Why can’t the Station connect to a Wi-Fi access point?
Please disconnect the physical Ethernet cable first. The Station will only initiate a Wi-Fi connection once it detects that the wired network is disconnected.
Have Question? We are here to help
Q: Why can’t the Station connect to a Wi-Fi access point?
A: Please disconnect the physical Ethernet cable first. The Station will only initiate a Wi-Fi connection once it detects that the wired network is disconnected.
Q: How can I achieve the best wireless projection performance?
A: Whether the Station is acting as an AP (Access Point) or connecting to another router, we recommend using the 5G Wi-Fi band exclusively.
Q: How do I set up network isolation for security purposes?
A: By default, the wired connection is for the internal network (company/school), and the wireless signal provides IP addresses for the external network. You can use Gatekeeper settings to further restrict access from the external network to the internal network.
Q: What are the limitations of Bridge Mode?
A: In this mode, the wired network does not support Static IP addresses; the IP must be assigned to the Station by a DHCP server.
Q: Why can I still interact with a webpage after setting Gatekeeper rules?
A: New rules only apply to "new connections." It is recommended to restart the Station to terminate existing sessions and apply the new rules.
Q: Which TCP/UDP ports does the ASTROS Station use?
A: Please refer to the table below.

Q: Why does AirPlay sometimes allow projection without a login code?
A: AirPlay remembers the authentication status for a short period. If the login code has not been changed and you project again within a short time, the system will reconnect automatically.
Q: Which Google Cast devices are supported by ASTROS Station?
A: It supports screen mirroring for Chromebooks, Chrome browsers, and Android devices. Please note that casting via the Google Home App is not supported.
Q: Why can't I enter a login code when using Google Cast?
A: The Google Cast protocol itself does not support a login code verification mechanism.
Q: Which browsers support direct projection? Do they require plugins?
A: Edge (v88+) and Chrome (v79+) both support native projection; no additional extensions or plugins are required.
Q: Can I adjust the volume while projecting?
A: When projecting photos, videos, or YouTube, volume changes made within the app may be less noticeable. It is recommended to adjust the physical volume of the display or TV directly.
Q: What is the maximum resolution supported by the Station?
A: HDMI output alone supports up to 4K@30Hz. If HDMI and VGA are used simultaneously, the maximum resolution is 1080p@60Hz.
Q: Why is the HDMI resolution menu grayed out and unadjustable?
A: The HDMI cable must be connected to a display device first. This allows the Station to read the device's supported resolutions (EDID) before the list becomes available.
Q: Why is there no image when the VGA cable is connected?
A: The Station defaults to HDMI output. Please go to the settings page and switch the output mode to "HDMI and VGA."
Q: What should I do if the projected image is cropped (overscanned)?
A: This is usually a display setting issue. Please adjust the "Aspect Ratio" or "Scan Mode" settings on your TV or monitor.
Q: What should I do if I forget the web configuration password?
A: Please long-press the power button for 8 seconds to perform a factory reset. The default login password is admin.
Q: What USB flash drive formats does the Station support?
A: The Station only supports the FAT32 format.
Q: Why can't the ASTROS App find the Station?
A: The App only supports discovery within the same network segment. Please ensure your computer and the Station are on the same subnet. If the Station still doesn't appear, please manually enter the Station's IP address to connect.
Q: Why is Google Cast unable to find the Station?
A: Please go to the Station's settings page and verify that the "Date and Time" settings are correct. Re-scan after calibrating the time.
Q: Why is there no sound when using the Windows App?
A: First, check if the App's control panel is muted. If unmuted and there is still no sound, note that some computers using AMD CPUs or Conexant drivers require you to also unmute the computer's system volume to sync the audio.
Q: Why is there no sound when using the macOS App?
A: macOS requires the BlackHole audio driver. Ensure it has been installed as instructed and that the ASTROS App has been granted the necessary permissions in System Settings.
Q: Why is there no sound from my MacBook after closing the macOS App?
A: The system may not have automatically switched back to the default output. Please go to macOS "Sound Settings" and manually change the Output device from BlackHole back to "MacBook Pro/Air Speakers."
Q: Why is the frame rate slow when using Remote View?
A: This is usually related to the computer's power management. Please adjust your computer's power settings to "High Performance" or "Balanced" mode to improve the refresh rate.
Q: Why can't I project by clicking the AirPlay icon within YouTube on macOS?
A: We recommend using the macOS built-in "Screen Mirroring" feature to connect to the Station first, then play the YouTube video after the connection is established.
Q: Why is the screen black when projecting via QuickTime?
A: The Station does not support AirPlay Digital Rights Management (DRM). We recommend using the ASTROS macOS App for screen mirroring instead.
Q: What is the difference between the Windows App "Installer" and "Portable" versions?
A: The Installer version associates Quick Join files (.aqj) with the App and provides OTA (Over-the-Air) online update functionality.
Q: How do I perform a silent installation or uninstallation of the Windows App?
A: Please open the Command Prompt as an Administrator and execute the following commands (assuming the installer is located on the D: drive):
msiexec /i D:\ASTROSApp.msi /qnmsiexec /x D:\ASTROSApp.msi /qnLocate the BYOM icon within the ASTROS App and click on it.


Once connected, you can use the audio and video peripherals attached to the ASTROS Station. Open your preferred conferencing software (e.g., Zoom, Microsoft Teams, Google Meet) and adjust the following settings:


Please ensure the video conferencing device is securely connected to the Station.
Additionally, verify that the camera, microphone, and speaker icons are visible on the standby screen.

Please install the ASTROS App BYOM driver before attempting to use this function.

The ASTROS App provides a 7-day trial, allowing you to fully experience the BYOM feature.

After your 7-day trial of BYOM expires, please contact our Sales team to purchase a license.
Contact us via our website: https://astrogate.com/contact-us

Please ensure that camera access permissions are enabled for the software you are using (e.g., Windows Camera, Microsoft Teams, or Zoom).


First, ensure the ASTROS App is installed on your device (Supported on Windows, macOS, iOS, and Android).
Simply click the Remote View icon shown below:


The main display will now be wirelessly delivered to your device. From here, you can:
One ASTROS Station can deliver the main screen to a maximum of 20 devices simultaneously.

A: Please ensure that the "Allow Remote View" setting is enabled. You can find this option on either the Landing Page or within the OSD Menu on your IFP.

Follow these steps to share your PC screen or specific application windows across two or more monitors using ASTROS Stations.
Ensure that both ASTROS Stations (connected to your monitors) and your laptop are connected to the same local sub-network.

Open the ASTROS Windows App on your laptop. If your devices are on the same network, the two Stations will automatically appear in the device list.


To display different content on each screen, use the Window Sharing feature:

Is more than one VM connected to the same environment?
If you have multiple VMs (e.g., VM A and VM B) and the device appears offline on VM A, please check if it shows as "Online" on VM B.
To ensure the device connects to the correct VM, follow these steps:
Station > Configuration > System > Reset.
Station > Configuration > Remote Access.

Station > Configuration > System > Reboot.

Download the ASTROS Manager Virtual Machine (.ova) file from our official website: Astrogate Downloads
You can start the import process in two ways:
.ova file..ova file.

Before starting the VM, ensure the following network settings are correctly configured:

Double-click the Virtual Machine in the list to start it.

Once the system boots up, the ASTROS Manager server interface will appear, indicating it is running.

You can now log in to the ASTROS Manager for further configuration.
admin


To configure a static IP, you must log in to the VM console:
mgmadminmgmadmin
Enter the following commands to navigate to the network settings directory:
mgmadmin@AstrogateMGM-94B0:~$ sudo su
[sudo] password for mgmadmin:
root@AstrogateMGM-94B0:/home/mgmadmin# cd /etc/netplan/
root@AstrogateMGM-94B0:/home/mgmadmin# ls
00-installer-config.yaml
root@AstrogateMGM-94B0:/home/mgmadmin# vi 00-installer-config.yaml
A screenshot for reference in the test VM:

In the vi editor, press the "i" key to enter Insert Mode.
! Important ! YAML files are sensitive to spacing. Ensure you follow the exact indentation format below:


:wq and press Enter to save and exit the editor.”00-installer-config.yaml” 12L, 276C written
root@AstrogateMGM-94B0:/home/mgmadmin# netplan apply
root@AstrogateMGM-94B0:/home/mgmadmin# reboot
A screenshot for reference in the test VM:
After the reboot, the VM will restart.

admin
If your device appears Offline, please check if you have connected two or more Virtual Machines (VMs) within the same environment. For instance, if you have VM(A) and VM(B), and the device needs to be connected to VM(A), please verify if it is currently showing as "Online" on VM(B).
Please follow these steps to ensure the device connects to the correct VM:


Version support
Station FW: 2.2.1.428 or later
Web: 2.0.0.52 or later

To migrate your ASTROS Manager Virtual Machine (VM) and its configurations to a new PC, please follow these steps:


.ova file will be saved in the folder you specified.
.ova file to the new PC.

Before launching the VM, please ensure the network settings match the new hardware:


admin

There are several options for integrating the ASTROS Station into your network environment. We recommend connecting the ASTROS Station to the corporate network via Ethernet before performing any Wi-Fi configurations.
In this mode, the ASTROS Station acts as a dedicated wireless access point.

Setup: Go to Landing page > Wi-Fi > Select "ASTROS as AP" > Click Apply.
Connection: You can find the ASTROS SSID in your computer's Wi-Fi list and connect to it directly.

Connect the ASTROS Station to your organization's LAN using a physical cable.
Physical Connection: Organization LAN > Ethernet Cable > ASTROS Station.

Setup: Go to Landing page > Ethernet > Configure your settings > Click Apply.

ASTROS Station → Wi-Fi → Your device

Access: * If you turn ASTROS Wi-Fi off, you can connect your user device to the organization's existing Wi-Fi (as long as it is on the same LAN as the ASTROS Station).

Alternatively, you can still connect your device directly to the ASTROS Station's Wi-Fi.
Connect the ASTROS Station to the organization's network wirelessly (Wi-Fi Bridge).

Pre-requisite: Before switching the Wi-Fi mode, please ensure the station is connected to a physical LAN to maintain access during configuration.
Setup: Go to Landing page > Wi-Fi > Select "ASTROS connects to another AP" > Click Apply.
Access: Once configured, your device will be able to discover and connect to the ASTROS Station through the organization’s network.

Open your web browser and log in to the Station Web Portal by entering its IP address or https://[Your_Station_Name].
Navigate to Configuration > APP BYOM > APP BYOM Activation.
Enter your license key in the text field and click Submit.

Once the license is successfully applied, the status will display as "Activated", as shown below.


To prevent unauthorized users from interrupting your presentation, follow these steps to secure your session with a login code:


Note: The "Apply" button will remain greyed out if no changes are made.
| Type | Description |
| Random |
A 4-digit code is automatically generated. The code refreshes whenever all users disconnect or the station reboots.
|
| Fixed |
You manually set a permanent 4-digit code that remains the same for every session.
|
| No Code | (Default) No login code is required; anyone can connect to the station. |
Once enabled, the 4-digit login code will be displayed on the ASTROS main standby screen. Users must enter this code to start mirroring their screen.

First, download and install the POD software from the link below: Download Pod Utility

In the Details window, you will find the POD FW Version listed as shown below:

We still strongly recommend connecting the POD directly to your PC to ensure stable signal transmission. However, if a direct connection is not possible, please refer to the technical requirements below.
What is USB-C DisplayPort (DP Alt Mode)? USB-C ports capable of transmitting DisplayPort signals are referred to as USB-C DisplayPort or DP Alt Mode ports.
How does it work? DP Alt Mode allows a single USB-C port to transfer data and high-definition video across multiple interfaces, utilizing the widely-used DisplayPort video standard.


If you encounter any of the following issues, please follow the instructions below to resolve them:
1. POD LED turns Amber when plugged into a PC:


2. POD LED turns Red when pairing with the Station:
3. POD displays Solid Light Blue when plugged into the Station:


Black Bars
Black bars can occur due to differences in resolution and aspect ratios between your devices and the ASTROS POD. Here’s a detailed explanation:
1. Common Resolution and Aspect Ratios for notebooks or monitors:

2. Content and Canvas Size Differences: Depending on how the content and canvas sizes interact, the following conditions may apply:
- Scenario 1 -
16:10 content applies to a 16:9 canvas. Black bars appear on 2 sides.
Canvas: 16:9
Content: 16:10

- Scenario 2 -
16:9 content applies to a 16:10 canvas. Black bars appear on top and bottom.
Canvas: 16:10
Content: 16:9

Question: Why do I have black bars on 4 edges on my monitor when I project my PC screen through ASTROS POD?
Answer: It could be due to your notebook is 16:10 aspect ratio, projecting through POD to a 16:10 monitor.
Let’s make it into 2 steps:
Notebook Content (16:10) → POD Canvas (16:9): 
16:10 aspect ratios scale down to fit the 16:9 canvas.
Black bars may appear on both sides of the screen.
POD (16:9) → Monitor (16:10): Additional black bars may appear on the sides, as the monitor compensates for the POD's 16:9 output. 
16: 9 aspect ratios with black bars on sides scale up to fit the 16:10 canvas.
Black bars may appear on 4 edges on the screen.

Development timelines vary from 8–20 weeks depending on features, security needs, and integrations. We follow an agile process to ensure fast, high-quality delivery.
Make sure the video is not muted. When sharing content from an iPhone or iPad via AirPlay, the audio may be muted by default. Turn up the volume on your device and check the video's audio settings.
Please go to Nureva Configuration page > USB port: select “FullSpeed”.
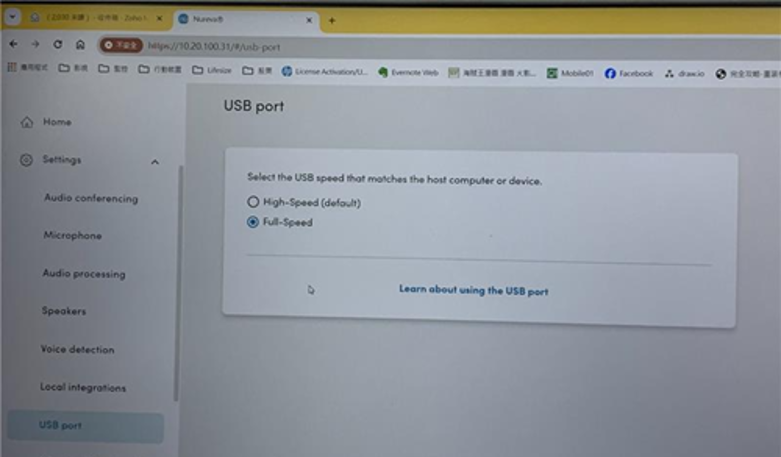
Reference: https://support.nureva.com/docs/adjusting-usb-speed-with-nurevaapp
This is expected behavior in macOS and also occurs when using our Pod (Sender) or a direct HDMI connection. When audio is output through an external digital audio device, macOS may disable the system volume controls.
As a workaround, you can use eqMac or another third-party audio control application to adjust the output volume.
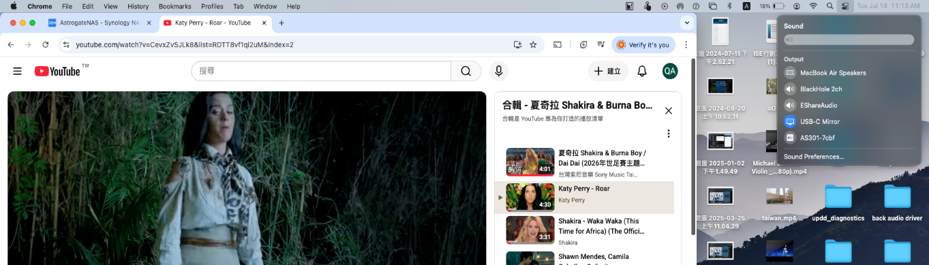
Third-party tool:
Tool download link: eqMac - System Audio processing for macOS
The forum information for the reference: Why does OSX/MacOS lock the volume control for external devices. Is there a way around it?